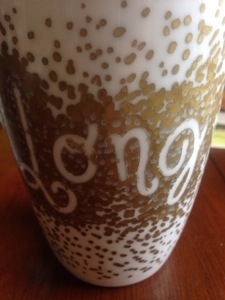
The DIY Sharpie mug is all over Pinterest lately. Loving personalized gift-giving, I had to try it too! I did a bit of research, and read other’s accounts of successes and failures before deciding to try it myself. What a perfect inexpensive, yet thoughtful, gift! I made them for my boys’ teachers.
I have tried scratching at the finished product after the oven baking, and again after a run through the hot, steamy dishwasher. The ink didn’t budge!! SUCCESS!
There seem to be a couple tricks. The first one is using the oil based sharpies. I believe the regular sharpies would work for something decorative that wouldn’t be through a dishwasher cycle, but for these I wanted to make sure they’d stand up to every day use.
The second trick is baking them hotter a tad longer. I went with 425* for 40 minutes, instead of the popular 350* for 30.
I bought a pack of two (gold and silver) oil-based sharpies at Michael’s with a 50% off coupon. Don’t you just love those coupons? The silver came out great. The gold turned into a bronze after being in the oven. I didn’t buy the cheapest mugs I found because I found a couple I really liked and wanted the wonderful teachers to as well. They’re Better Homes & Gardens brand from Wal-Mart. I couldn’t find the font I liked in their scrapbooking section, so I bought those at Michael’s (on sale for 40% off!).
Here’s some pictures of the process and finished products.
I washed the mugs thoroughly in hot water and Dawn. I dried them very well. Then I centered my letters, smoothing them with my fingernail to make sure they were on well.
I chose my marker and began dotting around the letters. You could really do any kind of pattern you like. I almost wish I found teaching quotes and used smaller letters. Maybe I’ll make more. 😉
I let the mugs cure for 24 hours before baking, so they aren’t a super quick finish project, and it definitely took some time to complete the dotting.
Don’t forget to remove your stickers before baking! They came off quite easily, but make sure the paint is totally dry first.
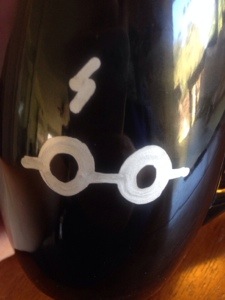
We’re quite the Harry Potter fans around here… I had an extra mug so I thought I would make one to *ahem* test the durability… 😉 The other side of the HP mug says “Accio Coffee”.
My boys were so excited by these mugs when they got home, I might just have to make them each their own personalized mug for Christmas too!!!


